There are many common misconceptions around Salt, and very often people seem to miss that Salt is more than a configuration management product, while it is a rich orchestrator with configuration management capabilities. Yet another interesting assertion I heard recently was: “In Salt is very hard or impossible to setup chatops”. Nothing more incorrect. I didn’t know how easy it is till this morning, when I had a few minutes to play around. The answer is: just a couple of YAML lines.
In this post I am going to use the hipchat engine, but exactly the same methodology can be applied when using Slack – one should notice that even the configuration options are exactly the same!
HipChat setup
- Create a dedicated user, although you can even use your personal account
- From the admin panel:
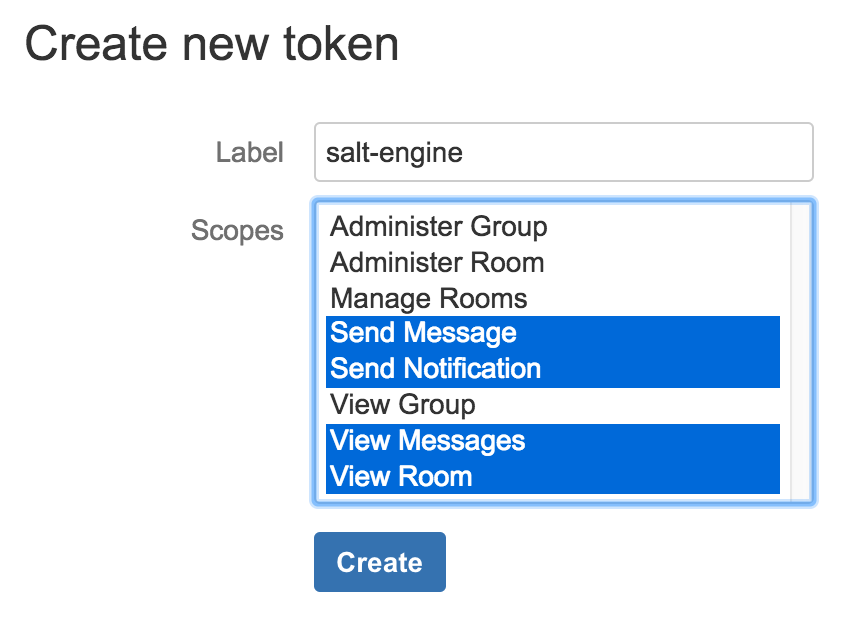
Edit Profile->API Accessscroll to theCreate new tokensection. Assign a label and select the scopes:

This will generate a new HipChat token, which is a 40 characters long string.
Under the API Access page, a new line should appear, looking like:

In this example, TD8IUisiNZuhmyumRGhh3S5AJ7SdEFXvRanITgNk is the generated token and what I will use in the configuration below.
Setup Salt
In the very first place, make sure that the machine running the Salt master is able to execute HTTP requests to the HipChat server (https://api.hipchat.com/ if you are using the public API).
In the documentation it says that the HipChat engine depends on hypchat, so we need to install that Python package: pip install hypchat. This library does not have any particular system dependency.
This tutorial assumes that you have the NAPALM and Salt environment setup. To ensure this, here are a couple of resources:
- my recent RIPE 74 tutorial
- the official Salt network automation documentation
- Some of my previous posts: installation or introduction
In my sandbox I had two devices: device1 running Junos and device2 running IOS.
I am going to add the following lines in the master config file (tipically /etc/salt/master):
engines:
  - hipchat:
      token: TD8IUisiNZuhmyumRGhh3S5AJ7SdEFXvRanITgNk
      room: 'Network Automation'
      control: True
5 lines – that’s all required for the basic usage. The salt-master process must to be restart everytime after its configuration file is changed.
Typing ! net.arp target=device1 in the Network Automation hipchat room, we can see a new event pushed on the Salt event bus:
salt/engines/hipchat/incoming {
    "_stamp": "2017-05-24T10:19:30.657648",
    "date": "2017-05-24T10:19:30.682426+00:00",
    "from": {
        "id": 298,
        "links": {
            "self": "https://api.hipchat.com/v2/user/298"
        },
        "mention_name": "Mircea",
        "name": "Mircea Ulinic",
        "version": "SAT2E7EA"
    },
    "id": "bc6e6dee-8c72-440d-8551-032f3bb2d6d3",
    "mentions": [],
    "message": "! net.arp target='device1'",
    "type": "message"
}
Which creates a new job to be executed on device1:
20170524101930719629  {
    "_stamp": "2017-05-24T10:19:30.720284",
    "minions": [
        "device1"
    ]
}
salt/job/20170524101930719629/new {
    "_stamp": "2017-05-24T10:19:30.720552",
    "arg": [],
    "fun": "net.arp",
    "jid": "20170524101930719629",
    "minions": [
        "device1"
    ],
    "tgt": "device1",
    "tgt_type": "glob",
    "user": "root"
}
And at the end, the device provides its ARP table, following NAPALM’s format:
salt/job/20170524101930719629/ret/device1 {
    "_stamp": "2017-05-24T10:19:30.948945",
    "cmd": "_return",
    "fun": "net.arp",
    "fun_args": [],
    "id": "device1",
    "jid": "20170524101930719629",
    "retcode": 0,
    "return": {
        "comment": "",
        "out": [
            {
                "age": null,
                "interface": "em1.0",
                "ip": "128.0.0.16",
                "mac": "02:00:00:00:00:10"
            },
            {
                "age": 1211.0,
                "interface": "fxp0.0",
                "ip": "172.31.0.1",
                "mac": "02:8B:CA:89:F9:35"
            },
            {
                "age": 433.0,
                "interface": "fxp0.0",
                "ip": "172.31.0.2",
                "mac": "02:8B:CA:89:F9:35"
            },
            {
                "age": 647.0,
                "interface": "fxp0.0",
                "ip": "172.31.5.175",
                "mac": "02:E0:CF:EB:1B:F1"
            }
        ],
        "result": true
    },
    "success": true
}
To retrieve the ARP table only from a certain interface, one is able to execute: ! net.arp interface=em1.0 target=device1.
Targeting one or more devices follows the specifications from Targeting Minions, where the keywords are target and tgt_type. For example, if we want to execute a ping to 8.8.8.8 from all Juniper MX960 routers, we can do so by typing: ! net.ping 8.8.8.8 target=model:MX960 tgt_type=grain.
To filter users, allow only certain commands and define aliases, we can define a structure as in the example below:
engines:
  - hipchat:
      token: TD8IUisiNZuhmyumRGhh3S5AJ7SdEFXvRanITgNk
      room: 'Network Automation'
      control: True
      valid_users:
        - Mircea
      valid_commands:
        - test.ping
        - net.arp
        - list_jobs
      aliases:
        list_jobs:
          cmd: jobs.list_jobs
        get_arp_tables:
          cmd: net.arp target=device*
        ping_google_from_vmx:
          cmd: net.ping 8.8.8.8 target=model:VMX tgt_type=grain
And we can simply type: ! ping_google_from_vmx and it returns in HipChat:

Which uploads a file with the result of the execution:
{
    "device1": {
        "comment": "",
        "out": {
            "success": {
                "packet_loss": 0,
                "probes_sent": 5,
                "results": [
                    {
                        "ip_address": "8.8.8.8",
                        "rtt": 20.279
                    },
                    {
                        "ip_address": "8.8.8.8",
                        "rtt": 19.981
                    },
                    {
                        "ip_address": "8.8.8.8",
                        "rtt": 19.903
                    },
                    {
                        "ip_address": "8.8.8.8",
                        "rtt": 20.031
                    },
                    {
                        "ip_address": "8.8.8.8",
                        "rtt": 20.205
                    }
                ],
                "rtt_avg": 20.079,
                "rtt_max": 20.279,
                "rtt_min": 19.903,
                "rtt_stddev": 0.14
            }
        },
        "result": true
    }
}
Note that also the special character ! can be replaced with something else in case the user prefers, using the trigger option in the engine configuration.
As well as running operational commands, one can also execute states directly from HipChat or Slack and apply configuration changes. Another advantage of Salt is that it permits a dry-run mode that returns the configuration diff; afterwards, if the diff looks right, the user can deploy the changes. For example, using the netntp state that manages NTP peers & servers configuration, one execute a dry run: ! state.sls router.ntp test=True target=device1. If the output looks good, they will commit by running the same command, withouth the test flag: ! state.sls router.ntp target=device1.
Conclusions
We’ve seen that enabling chatops in Salt for network automation needs is almost trivial, requiring only 5 lines of YAML to be appended to the master configuration file. Afterwards, the user can apply the same methodologies as running Salt commands from the CLI.